Scrolling through overlanding forums and Instagram builds is a dangerous hobby for your wallet. Every rig looks incredible with its rooftop tent, light bars, and snorkel — right up until the owner admits they spent $15,000 on mods and the truck has only been on two trails. The overlanding community has a pattern: beginners overbuild, overspend, and end up selling half their gear on Craigslist within a year. Here are the seven mistakes that consistently cost more to fix after the fact than to prevent from the start.
This article includes affiliate links. We may earn a commission at no extra cost to you.
Exceeding Your Vehicle’s Payload Capacity
This is the most common and most dangerous mistake, and most beginners do not even know they are making it. Your vehicle has a Gross Vehicle Weight Rating — a hard limit on how much weight it can safely carry including passengers, fuel, and every single mod you bolt on. A typical mid-size SUV like a 4Runner has a payload capacity of about 1,500 pounds. That sounds like a lot until you start adding it up.
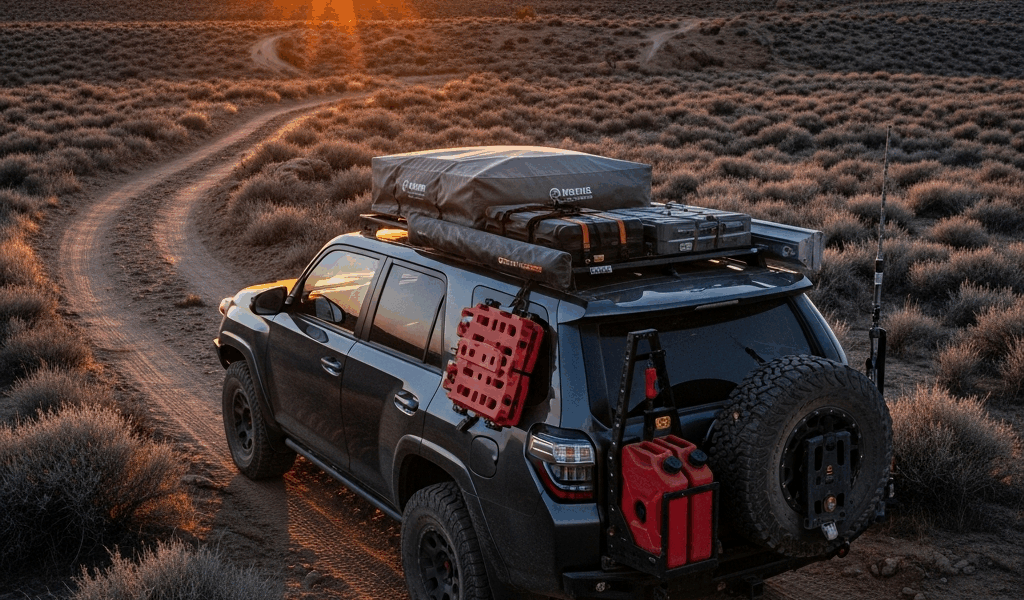
Steel front bumper: 150 pounds. Rear bumper with swing-out: 200 pounds. Roof rack: 50 pounds. Rooftop tent: 120-180 pounds. Full-size spare on a swing-out carrier: 80 pounds. Dual battery system: 60 pounds. Water tank and water: 70 pounds. You have burned through 730-790 pounds before putting a single piece of gear or a single person inside the vehicle.
Driving overweight destroys suspension components, warps brake rotors, overheats transmissions, and turns your vehicle into a rollover risk on uneven terrain. The cost to rebuild a suspension system after a season of overloaded driving: $2,000 to $4,000. The cost of weighing your build at a truck scale before you finalize it: free. Every CAT scale at a truck stop charges $12 to weigh your vehicle. That $12 could save you thousands.
Buying the Rooftop Tent First
The rooftop tent is the sexiest mod. It is also the last one you should install. But it is the first thing every beginner buys because it makes the truck look like an adventure vehicle in the driveway.
Here is the problem: a $2,500 rooftop tent mounted on stock suspension and highway tires looks ready for Instagram and is useless on the trail. The tent adds weight up high, which makes the vehicle top-heavy. Stock suspension is not tuned for that load distribution. Highway tires have zero sidewall protection and will puncture on the first sharp rock. You have the camping part figured out and none of the getting-there part.
The correct build order that experienced overlanders will tell you: tires first (most critical single upgrade), then suspension (matched to your target weight with all planned mods), then recovery gear (because you will get stuck), then storage and electrical, then sleeping setup. The tent goes last because it does not matter where you sleep if you cannot get to the trailhead.
Over-Lifting the Vehicle
A 3-inch lift with aggressive fender flares looks mean in the parking lot. On the trail, it creates problems that compound over time. Every inch of lift raises the center of gravity, making the vehicle more prone to body roll and tipover on off-camber sections. CV joints and ball joints operate at steeper angles than they were designed for, accelerating wear dramatically.
A 2-inch lift with quality adjustable shocks is the practical ceiling for most overland builds. It provides enough clearance for 33-inch tires without putting excessive stress on drivetrain components. Going beyond 2 inches usually requires extended-travel CV axles — that is an extra $800 to $1,500 in parts plus installation that you would not need with a conservative lift.
The irony is that ground clearance comes more from tire size than from lift height. A 2-inch lift with properly sized tires gives you nearly the same ground clearance as a 4-inch lift on smaller tires, with dramatically better on-road handling and component longevity.
Ignoring Electrical Planning
You install a fridge. Then LED light bars. Then USB charging ports. Then a winch. Each one draws from the same battery, and eventually you wake up on a Tuesday morning at camp to a dead start battery and no cell service.
A dual battery system is not optional for any build that includes a fridge or significant electrical accessories. The isolator keeps your start battery charged while your auxiliary battery runs accessories — so your fridge stays cold all night without killing your ability to start the engine in the morning. The cost of a proper dual battery setup installed during the initial build: $400 to $800 depending on battery type. The cost of having a shop retrofit one after all the other wiring is already done: $1,200 to $2,000, because they have to tear apart existing wiring to integrate it cleanly.
Plan for 200 or more amp-hours of auxiliary battery capacity if you are running a fridge and basic 12V lighting. Lithium batteries cost more upfront but weigh half as much and last 3 to 5 times longer than AGM batteries — for an overland build where weight matters, lithium pays for itself.
Wrong Tires for Your Actual Terrain
Mud-terrain tires look aggressive and sound even more aggressive — they drone on the highway at 70 mph like a small airplane is following you. They wear faster on pavement, have longer stopping distances on wet roads, and most overlanders drive 85 to 90 percent of their miles on asphalt getting to and from trails.
All-terrain tires are the right answer for the vast majority of overland builds. They handle gravel, dirt, sand, and moderate mud while remaining civilized on the highway. Specific recommendations that the overlanding community has validated over years: the BFGoodrich KO2, the Falken Wildpeak AT3W, and the Toyo Open Country AT3 are the three most consistently recommended ATs for overland use. All three offer good tread life, sidewall protection, and wet-road performance.
Only run mud-terrains if you are frequently on trails with deep mud, standing water, or loose clay — and you accept the highway tradeoffs. For everyone else, ATs handle 95 percent of what overlanders actually encounter.
Skipping Recovery Gear
Getting stuck is not a matter of if, it is when. Sand, mud, loose rock, misjudged water crossings — every overlander buries their rig eventually. Without recovery gear, you are calling a tow truck, and tow trucks that can reach you on a remote trail charge $300 to $500 per call. If you are in a spot that requires a flatbed, double it.
A basic recovery kit costs $200 to $400 and pays for itself the first time you use it. The essentials: a pair of traction boards (MaxTrax or BUNKER INDUST), a kinetic recovery rope (not a tow strap — kinetic ropes stretch to reduce shock loads), a pair of rated D-ring shackles, a tree trunk protector, and a compact shovel. Store it all in a bag that lives in the vehicle permanently.
A winch is the premium recovery tool — $800 to $2,000 depending on rating and brand — but it is not a substitute for the basics. A winch without a tree protector damages trees and gets you banned from trails. Traction boards solve 80 percent of stuck situations faster than rigging a winch line.
Mall Crawler Syndrome
The final mistake is building for the driveway instead of the trail. Every mod should pass one test: will I actually use this in the next six months on a real trip? If the answer is no, skip it. Light bars you never turn on, a snorkel on a truck that never sees water deeper than a puddle, a winch fairlead that has never held a line — these are expensive decorations, not functional modifications.
The most capable overlanders I have met run surprisingly simple rigs. Quality suspension, good tires, a fridge, a sleeping setup, recovery gear, and basic electrical. That is the build that actually goes places. Everything beyond that either solves a specific problem you have encountered on real trips, or it is a mall crawler accessory pretending to be adventure gear.
Build for the trails you are going to run this year. Upgrade based on real experiences, not YouTube builds. The rig that is 80 percent ready and gets used beats the rig that is 100 percent built-out and never leaves the garage.


Leave a Reply